Home » Nest.Js » How To Cache MongoDB Data In NestJs Using Redis
How To Cache MongoDB Data In NestJs Using Redis
Caching is a technique for storing data in memory so that it can be accessed more quickly. This can be a great way to improve the performance of your NestJs application.
There are many different caching solutions available, but one of the most popular is Redis. Redis is an open-source in-memory data structure store that can be used as a cache.
In this article, I will show you how to use Redis to cache MongoDB data in your NestJs application.
Table of Contents
Prerequisites
To follow along with this tutorial, you will need the following:
The first step is to setup a NestJs application. If you already have one, skip the step. Follow the article here for a step-by-step NestJs application setup. Or you can run the command below:
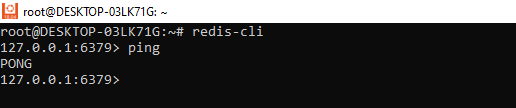
Check the Redis is configured properly and working.
Go to command line where Redis is setup and run redis-cli command. It will connect you to Redis server. Now hit ping command. You will get back PONG from Redis server.
Redis Setup Ubuntu
Now configure the Redis Cache in NestJs application. Here is an example of how to configure the cache:
1
2
3
4
5
6
7
8
9
10
11
12
13
14
15
16
17
18
19
20
21
22
23
// app.module.ts
import{Module}from'@nestjs/common';
import{UsersModule}from'./users/users.module';
import{CacheModule}from'@nestjs/cache-manager';
import{redisStore}from'cache-manager-redis-yet';
@Module({
imports:[
CacheModule.register({
store:redisStore,
host:'localhost',// Redis Server Host name
port:6379,// Redis Server Port
isGlobal:true,// Make it true in case you want to use Redis Cache in other modules like UserModule
ttl:1000*60*5,// Redis Cache time in milliseconds
}),
UsersModule,
],
controllers:[],
})
exportclassAppModule{}
store: Pass redisStore as you want your data to be stored in Redis Server
host: Redis Server Host Name
port: Redis Server Port
isGlobal: Pass true in case you want to use Redis Caching in other modules
ttl: Time in milliseconds. I have put 5 minutes. My cache will be removed from Redis Server after 5 minutes of creation.
Using Redis Cache in NestJs
Once the cache is configured, we can start using it.
Inject the Cache class from cache-manager package.
@CacheKey('users')// I have used `users` key. You can use any key as per your code.
async findAll():Promise<User[]>{
returnawait this.userService.findAll();
}
}
Redis Cache Expiration Time (TTL)
In the example above, I have used global TTL for all the redis keys in app.module.ts file. However you can override the value depending upon the use case in any controller function or at controller level.
Here is an example of how to use Redis TTL in NestJs controller using a decorator:
@CacheTTL(10*60*1000)// Use the decorator here to override global TTL value for ex. 10 minutes
async findAll():Promise<User[]>{
returnawait this.userService.findAll();
}
}
Import CacheTTL from @nestjs/common module. Use CacheTTL decorator just above to a controller function or even at controller level. Pass time in milliseconds. In my example above I have passed 10 minutes.
Check Redis Cache values
Check the Redis Cached values by the custom key. I have used users as key to store my users data. Here is how to check values:
Use keys * to get all the keys stored in Redis server. Use GET <key name> to get the value of a particular key.
Redis Value at Particular Key
Conclusion
Caching is a great way to improve the performance of your NestJS application. In this article, we showed you how to use Redis to cache MongoDB data in your NestJS application.