Real-time communication has become an essential part of modern web applications. WebSockets provide a powerful way to enable real-time communication between the client and server. NestJs, a popular Node.js framework, provides built-in support for WebSockets. In this article, we will explore how to implement real-time communication using WebSockets and NestJs.
Table of Contents
Prerequisites
Before we begin, make sure you have the following installed on your machine:
- Node.js (version 12 or higher)
- A text editor of your choice
Follow our beginnner guides to Getting Started With NestJs: A Beginner’s Guide
Real-time Communication with Websockets and NestJs in Action
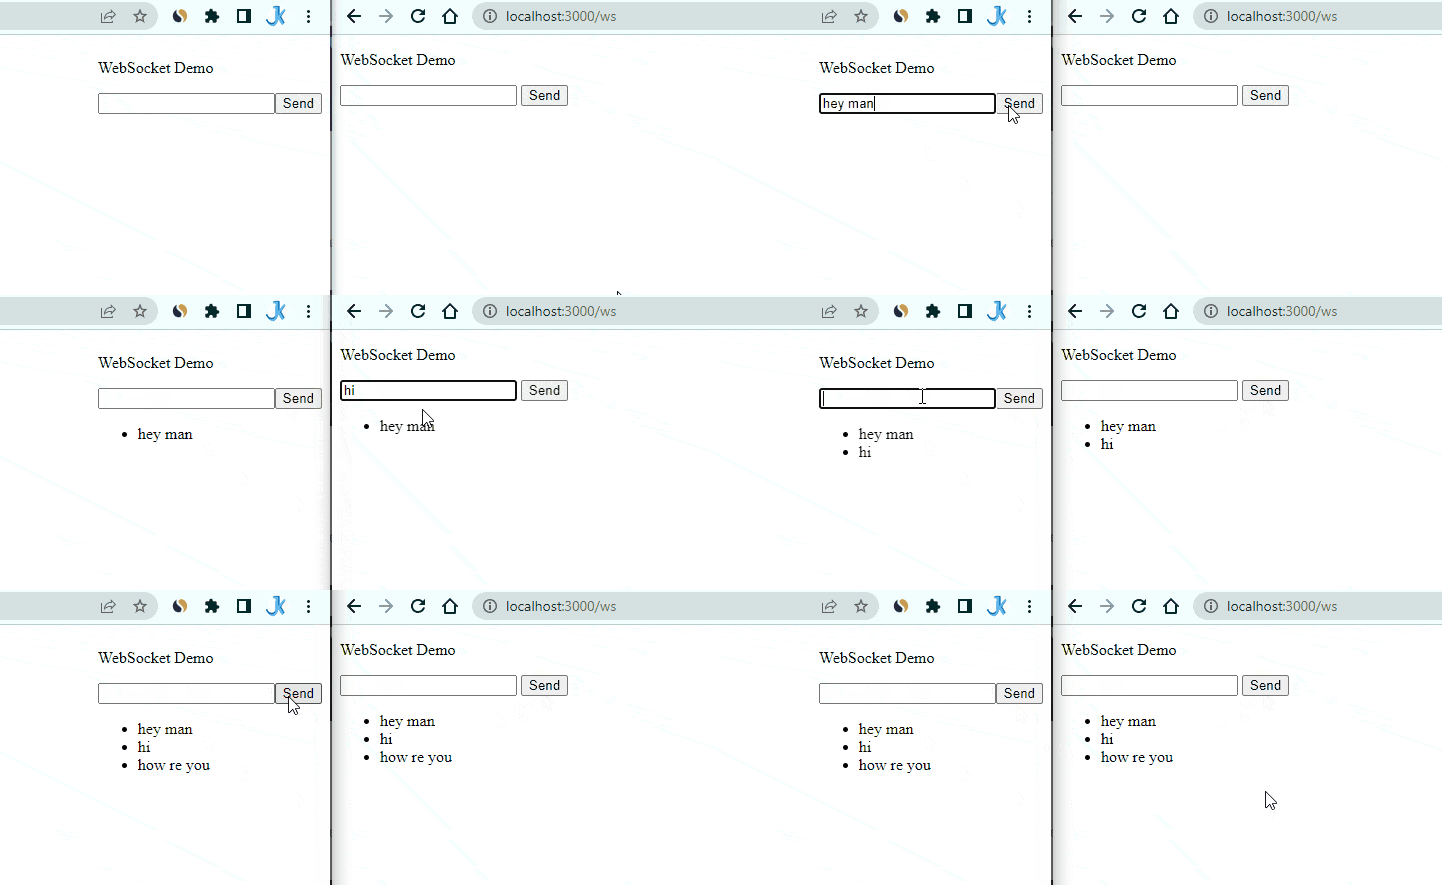
Here is the final result of how the real-time communication happens in NestJs with its inbuilt Websockets.

Follow the step-by-step guide to achieve the above result.
Setting up the Project
First, we need to create a new NestJs project. Open up your terminal and enter the following:
1 2 3 4 | npm i -g @nestjs/cli nest new websocket-demo |
This will create a new NestJs project called websocket-demo. Next, navigate to the project folder and install the required packages including @nestjs/websockets:
1 2 3 4 | cd websocket-demo npm i --save socket.io hbs @nestjs/websockets @nestjs/platform-socket.io |
This package provides the necessary functionality to use WebSockets in your NestJs application.
Implementing WebSockets
Now that we have our project set up, let’s implement WebSockets. First, we need to create a WebSocket gateway. This is where we will handle all WebSocket-related events. Create a new file called websocket.gateway.ts in the src folder with the following content:
1 2 3 4 5 6 7 8 9 10 11 12 13 14 15 16 17 | // websocket.gateway.ts import { WebSocketGateway, WebSocketServer, SubscribeMessage } from '@nestjs/websockets'; import { Server } from 'socket.io'; @WebSocketGateway() export class WebsocketGateway { @WebSocketServer() server: Server; @SubscribeMessage('message') handleMessage(client: any, payload: any): void { this.server.emit('message', payload); } } |
This is a basic WebSocket gateway that listens for a message event and broadcasts the payload to all connected clients.
Next, we need to update the app.module.ts file to include our WebSocket gateway. Open up the app.module.ts file and update it as follows:
1 2 3 4 5 6 7 8 9 10 11 12 13 14 15 | // app.module.ts import { Module } from '@nestjs/common'; import { AppController } from './app.controller'; import { AppService } from './app.service'; import { WebsocketGateway } from './websocket.gateway'; @Module({ imports: [], controllers: [AppController], providers: [AppService, WebsocketGateway], }) export class AppModule {} |
We have added our WebsocketGateway to the providers array.
Testing WebSockets
Now that we have implemented WebSockets, let’s test it out. Open up the app.controller.ts file and replace its contents with the following:
1 2 3 4 5 6 7 8 9 10 11 12 13 14 15 16 | // app.controller.ts import { Controller, Get, Render } from '@nestjs/common'; @Controller() export class AppController { @Get() @Render('index') root() { return { title: 'WebSocket Demo', }; } } |
This is a basic controller that renders an index view.
Setup main.ts file for handlebars default view engine.
1 2 3 4 5 6 7 8 9 10 11 12 13 14 15 16 17 18 | // main.ts import { NestFactory } from '@nestjs/core'; import { NestExpressApplication } from '@nestjs/platform-express'; import { join } from 'path'; import { AppModule } from './app.module'; async function bootstrap() { const app = await NestFactory.create<NestExpressApplication>(AppModule); app.setBaseViewsDir(join(__dirname, '..', 'views')); app.setViewEngine('hbs'); await app.listen(3000); } bootstrap(); |
Create a new file called index.hbs in the views folder with the following content:
1 2 3 4 5 6 7 8 9 10 11 12 13 14 15 16 17 18 19 20 21 22 23 24 25 26 27 28 29 30 31 32 33 34 | // index.hbs <!doctype html> <html> <head> <title>{{ title }}</title> </head> <body> <p>{{ title }}</p> <input type="text" id="message" /> <button id="send">Send</button> <ul id="messages"></ul> <script src="/socket.io/socket.io.js"></script> <script> const socket = io(); const messageInput = document.getElementById('message'); const sendButton = document.getElementById('send'); const messagesList = document.getElementById('messages'); sendButton.addEventListener('click', () => { socket.emit('message', messageInput.value); messageInput.value = ''; }); socket.on('message', (message) => { const li = document.createElement('li'); li.innerText = message; messagesList.appendChild(li); }); </script> </body> </html> |
This is a basic HTML view that includes a text input and a button to send messages, as well as a list to display received messages. We are using the socket.io JavaScript library to handle WebSockets.
Next, start the server by running the following command in your terminal:
1 2 3 | npm run start:dev |
This will start the server in development mode.
Open up your browser and navigate to http://localhost:3000. You should see the WebSocket Demo title and text input with a send button. Open up the browser console and make sure there are no errors.
Now, open up a new tab and navigate to the same URL. You should see two tabs with the same view.
Enter a message in one of the tabs and click the send button. You should see the message appear in both tabs.
Congratulations! You have successfully implemented real-time communication using WebSockets and NestJs.
Conclusion
WebSockets provide a powerful way to enable real-time communication between the client and server. NestJs provides built-in support for WebSockets through its @nestjs/websockets package. In this article, we explored how to implement real-time communication using WebSockets and NestJs. We also tested our implementation by creating a basic chat application.


