

JavaScript, being a dynamic and evolving programming language, is constantly updated with new features to improve developer productivity and enhance the language’s capabilities. In this article, we’ll explore these new JavaScript features in ES2022 that you should know and provide examples of how you can leverage them in your code to write more modern, efficient, and expressive JavaScript.
ES2022 is the 13th version of ECMAScript, and it brings several exciting new features that every JavaScript developer should be aware of.
Simplify Code and Improve Performance Using JavaScript Set Operator
Table of Contents
New JavaScript Features In ES2022
Let’s deep dive into the list of features which are introduced with ES2022. Here are some examples.
RegExp match indices
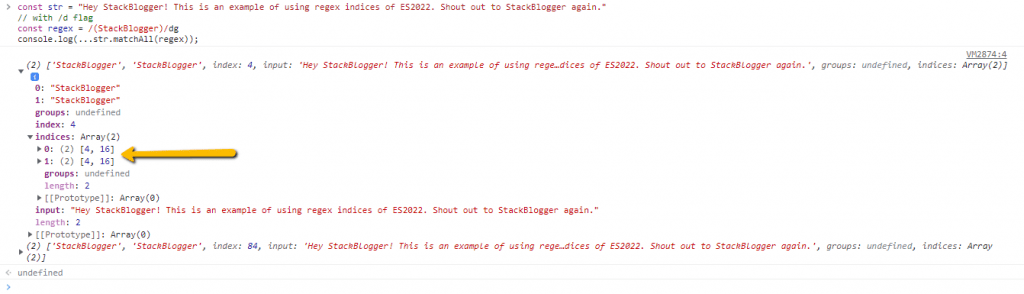
In certain situations, simply having the index of the match may not be enough; you may also need the start and end indices for each captured substring. Thankfully, ES2022 introduces a new JavaScript feature that allows you to use the character ‘d’ to express that you want both the starting and ending indices of the specified matched string. Let’s take a look at an example to better understand this feature:
1 2 3 4 5 6 7 8 9 10 11 12 13 14 15 16 17 18 19 20 21 22 | const str = "Hey StackBlogger! This is an example of using regex indices of ES2022. Shout out to StackBlogger again." // with /d flag const regex = /(StackBlogger)/dg console.log(...str.matchAll(regex)); // Output: // [ // 'StackBlogger', // 'StackBlogger', // index: 4, // input: "Hey StackBlogger! This is an example of using regex indices of ES2022. Shout out to StackBlogger again.", // groups: undefined, // indices: [ [4, 16], [4, 16], groups: undefined, length: 2 ] // ] [ // 'StackBlogger', // 'StackBlogger', // index: 84, // input: "Hey StackBlogger! This is an example of using regex indices of ES2022. Shout out to StackBlogger again.", // groups: undefined, // indices: [ [84, 96], [84, 96], groups: undefined, length: 2 ]// ] |
As you can observe, the enhanced RegExp match indices now provide an array with the start and end indices of the searched string.
Array .at() method to get index
In ES2022, a new method called .at() has been introduced in JavaScript to simplify the process of fetching elements from an array, especially when dealing with negative indexing. Prior to ES2022, square bracket notation was commonly used to fetch elements from an array, but it became cumbersome when dealing with backward iterations using negative indices. For example, the common practice was to use arr[arr.length - N], where arr.length refers to the length of the array indexed from the end. However, this approach requires naming the indexable twice and adding an additional seven characters for .length, making it less concise and efficient.
Another alternative, arr.slice(-N)[0], avoids some of the drawbacks of the arr[arr.length - N] approach, but it still has its own performance drawbacks due to creating a new array slice.
With the introduction of the .at() method in ES2022, this process has been simplified. The .at() method works similarly to square brackets for positive indexing, but it also allows for starting the iteration from the end when using negative indices. This eliminates the need for additional calculations and temporary variables, making the code more concise and efficient. Let’s take a closer look at the example below to understand how the .at() method can be used:
1 2 3 4 5 6 7 8 9 | const arr = [10, 20, 30, 40, 50]; // Positive indexing console.log(arr.at(2)); // Output: 30 // Negative indexing console.log(arr.at(-3)); // Output: 30 |
In the above example, we have an array arr with 5 elements. We use the .at() method to fetch the element at index 2 (positive indexing), which returns 30. We then use the same method with a negative index of -3, which starts the iteration from the end of the array and fetches the element at the corresponding position, also returning 30. This demonstrates how the .at() method simplifies the process of fetching elements from an array, including backward iterations with negative indices, in a more concise and efficient manner.
Top-level await
Before the introduction of ES2022, the use of await was limited to the scope of async functions in JavaScript. However, with the latest update, you can now use await outside the context of an async function, providing a solution for synchronization issues that you may have encountered previously. For instance, you can use await to pause the rendering of a module and its parent modules until the necessary resources are imported, ensuring proper coordination. This expanded usage of await in ES2022 allows for more flexibility and control in handling asynchronous operations in JavaScript code.
There are several use cases for top-level await:
1. Execute the Promise function without being in async scope.
1 2 3 4 5 6 7 8 9 10 | async function someAsyncMethod() { return new Promise((resolve, reject) => { resolve(console.log('Hey Man! It\'s StackBlogger Here..')); }) } await someAsyncMethod(); // OUTPUT Hey Man! It's StackBlogger Here.. |
The code defines an async function that creates a Promise and resolves it with a console.log() statement. The await keyword is used to wait for the Promise to resolve before proceeding with the execution of the async function.
2. Utilizing the resource that loads the fastest
1 2 3 4 5 6 | const resource = await Promise.any([ fetch('http://server1.com/module').then((response) => response.text()), fetch('http://server2.com/module').then((response) => response.text()) ]); |
Object.prototype.hasOwn Property
Object.hasOwn() is a static method in JavaScript that allows you to check if a specific property exists within an object. It returns true if the property is found directly in the object (i.e., it is “owned” by the object), and false if the property is inherited or does not exist. You can pass the object as the first argument and the property to check as the second argument to this method.
Object.hasOwn is designed as an alternative to Object.prototype.hasOwnProperty method, which has some limitations. For example, hasOwnProperty does not work for objects created using Object.create(null), as they do not inherit from Object.prototype, resulting in an exception when using hasOwnProperty on such objects. Additionally, hasOwnProperty can be overridden, as it is not a reserved JavaScript object method.
To avoid these issues, it is recommended to use Object.hasOwn over Object.prototype.hasOwnProperty(). While it is possible to work around these problems by calling hasOwnProperty() on an external object, using hasOwn() is more intuitive and ensures consistent behavior across different objects in JavaScript.
1. Example of using Object.prototype.hasOwnProperty() method:
1 2 3 4 5 6 7 8 9 | const car = { brand: "Toyota", model: "Camry", } console.log(car.hasOwnProperty("brand")); // Output: true console.log(car.hasOwnProperty("color")); // Output: false |
2. Example of using Object.hasOwn method:
1 2 3 4 5 6 7 8 9 | const computer = { brand: "Dell", model: "XPS", } console.log(Object.hasOwn(computer, "brand")); // Output: true console.log(Object.hasOwn(computer, "ram")); // Output: false |
3. Example of the issue with hasOwnProperty() not working for objects created using Object.create(null):
1 2 3 4 5 6 | const person = Object.create(null); person.name = "John"; console.log(person.hasOwnProperty("name")); // Output: TypeError: object2.hasOwnProperty is not a function console.log(Object.hasOwn(person, "name")); // Output: true |
4. Example of the issue with hasOwnProperty being overridden:
1 2 3 4 5 6 7 8 9 10 11 12 | const smartphone = { brand: "Apple", model: "iPhone", hasOwnProperty() { return false; }, } console.log(smartphone.hasOwnProperty("brand")); // Output: false console.log(Object.hasOwn(smartphone, "hasOwnProperty")); // Output: true |
Error cause
Errors are raised during runtime to detect and handle abnormal situations in a program. However, in cases where an error is thrown from a deep internal method, it may not be easy to determine the underlying cause without a well-designed exception handling pattern.
The .cause property of the error object provides a way to specify the reason behind unexpected exceptions. This allows for chaining of errors, which can be extremely useful in situations where functions are deeply nested. By chaining errors using the .cause property, it becomes possible to capture the underlying issues without having to wrap errors in overly complex conditions or formalities. This can greatly simplify error handling in complex codebases and facilitate more effective debugging and issue resolution.
Here are some similar example codes that demonstrate the use of the .cause property for chaining errors:
1. Example with fetching data from an API:
1 2 3 4 5 6 7 8 9 10 11 12 13 14 15 | function fetchData() { try { const response = await fetch('https://api.example.com/data'); if (!response.ok) { throw new Error('Failed to fetch data', { cause: response }); } const data = await response.json(); console.log(data); } catch (error) { console.error(error); throw new Error('Something went wrong', { cause: error }); } } |
2. Example with file operations:
1 2 3 4 5 6 7 8 9 10 11 12 13 14 15 | const fs = require('fs'); function readFile(filePath) { try { const fileContent = fs.readFileSync(filePath, 'utf-8'); console.log(fileContent); } catch (error) { console.error(error); throw new Error('Failed to read file', { cause: error }); } } readFile('file.txt'); |
3. Example with database operations:
1 2 3 4 5 6 7 8 9 10 11 12 13 14 | function getUser(id) { try { const user = db.getUserById(id); if (!user) { throw new Error('User not found', { cause: new Error(`Failed to get user with ID: ${id}`) }); } console.log(user); } catch (error) { console.error(error); throw new Error('Failed to get user', { cause: error }); } } |
These examples demonstrate how the .cause property can be used to chain errors and provide more detailed information about the underlying issues that led to the error.
Conclusion
Overall, the new features introduced in ES2022 empower JavaScript developers with improved syntax, increased productivity, and enhanced code maintainability. As JavaScript continues to evolve, staying updated with the latest language features can greatly benefit developers in writing modern and efficient JavaScript code.
![5 Best Sites To Learn JavaScript [FREE] In 2022](https://cdn.stackblogger.com/wp-content/uploads/2021/11/FREE-Sites-to-Learn-JavaScript-min-370x235.png "5 Best Sites To Learn JavaScript [FREE] In 2022")


