
Deploying an Angular application on AWS EC2 can be streamlined and automated using Terraform, a powerful Infrastructure as Code (IaC) tool. In this article, “How to Deploy Angular App to AWS EC2 Using Terraform,” we will guide you through the process of creating an EC2 instance in the default VPC, setting up the necessary environment, and deploying your Angular app while ensuring easy access over HTTP.
Whether you’re a beginner or an experienced developer, this step-by-step guide will help you navigate the deployment process with ease.
If you are a begineer and exploring Terraform then here is a simple Terraform script to create AWS EC2 Instance.
Table of Contents
Prerequisites
Before you begin, ensure that you have the following:
- An AWS account with permissions to create EC2 instances and security groups.
- AWS credentials configured on your system. You can set this up using the AWS CLI
aws configure
- Terraform installed on your local machine.
- (Optional) A public GitHub repository containing your Angular application code.
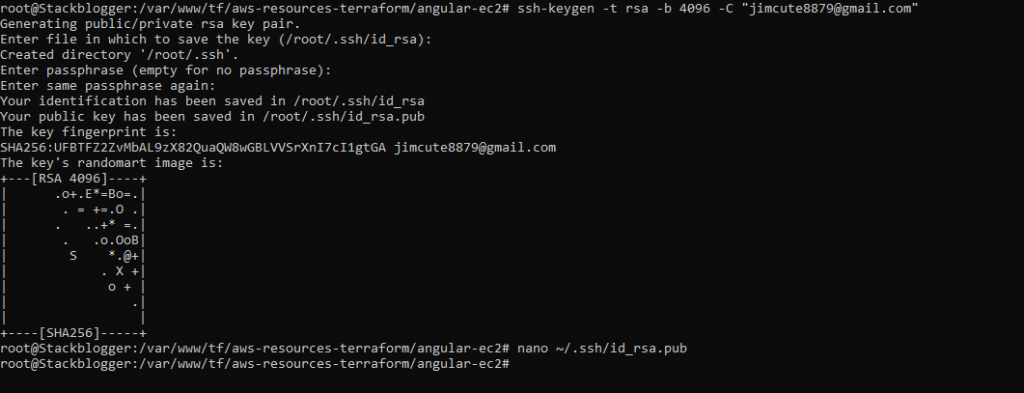
Generate an SSH Key Pair
If you don’t already have an SSH key pair for secure access to your EC2 instances, you’ll need to create one. Open your terminal and run the following command, replacing "email@stackblogger.com" with your actual email address:
1 2 3 | ssh-keygen -t rsa -b 4096 -C "email@stackblogger.com" |
Follow the prompts to save the key pair in the default location (typically ~/.ssh/id_rsa). You can press Enter to confirm the default file location. Make sure to keep the private key secure.
Clone the GitHub Repository
To quickly get started, you can clone the existing repository that contains the Terraform configuration to deploy your Angular application. Use the command below:
1 2 3 | git clone https://github.com/stackblogger/aws-resources-terraform.git |
Once cloned, navigate to the angular-ec2 folder:
1 2 3 | cd aws-resources-terraform/angular-ec2 |
Directory Structure and File Descriptions
When you navigate to the angular-ec2 folder, you will find the following directory structure, which is designed to keep the configuration organized and modular:
main.tf:- This is the primary configuration file for the Terraform setup. It defines the provider (in this case, AWS), retrieves the necessary data sources (such as the default VPC and the latest Ubuntu AMI), and sets up the module for deploying the EC2 instance.
- It references the input variables that specify parameters like the key name, repository URL, and instance type.
variables.tf:- This file contains the definition of input variables utilized throughout the Terraform configuration. Each variable is documented with a description to clarify its purpose.
- For example, it includes variables for the SSH key pair, the path to the public and private key files, the GitHub repository URL, and the EC2 instance type.
modules/instances/:- This folder contains the module that encapsulates the logic related to the EC2 instance configuration.
- It enables you to organize your code better and reuse configurations across different parts of your Terraform scripts.
modules/instances/ec2.tf:- This file defines the resources necessary for setting up the EC2 instance, including:
- The security group configuration allows SSH and HTTP traffic.
- The EC2 instance setup, with user data for installing software and cloning the Angular repository.
- It also outputs the public IP address of the EC2 instance for easy access.
- This file defines the resources necessary for setting up the EC2 instance, including:
modules/instances/variables.tf:- Similar to
variables.tfin the root directory, this file contains variable definitions specific to the instance module. - These variables are used to parameterize the EC2 instance configuration, allowing for flexibility and easier modifications without altering the core logic of the module.
- Similar to
Review and Update the terraform.tfvars File
In the angular-ec2 folder, you will find a terraform.tfvars file that already contains default values for your configuration. Open the terraform.tfvars file in your preferred text editor.
Example terraform.tfvars File
Here’s what the file might look like:
1 2 3 4 5 6 7 | key_name = "angular-ec2-key-pair" # Create a new key pair for ssh access public_key_path = "~/.ssh/id_rsa.pub" # Path to your SSH public key private_key_path = "~/.ssh/id_rsa" # Path to your SSH private key github_repo = "https://github.com/stackblogger/angular-rxjs-infinite-scroll.git" # Point to your Angular repo instance_type = "t2.medium" # EC2 instance type |
Modifications
key_name: Provide a key pair name.public_key_path: Confirm that this points to your actual public key file.private_key_path: Confirm that this points to your actual private key file.github_repo: Update the URL to point to your Angular application’s repository if necessary.
Initialize and Apply Your Terraform Configuration
With your variables set up, run the following commands to initialize Terraform and apply the configuration:
1 2 3 4 | terraform init terraform apply |
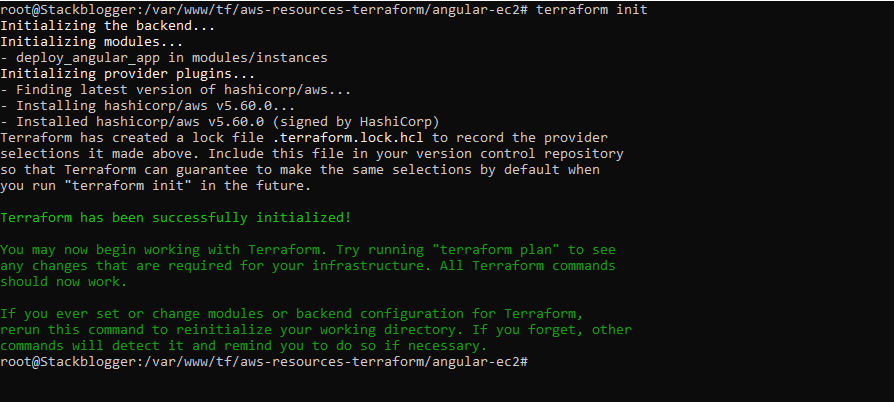
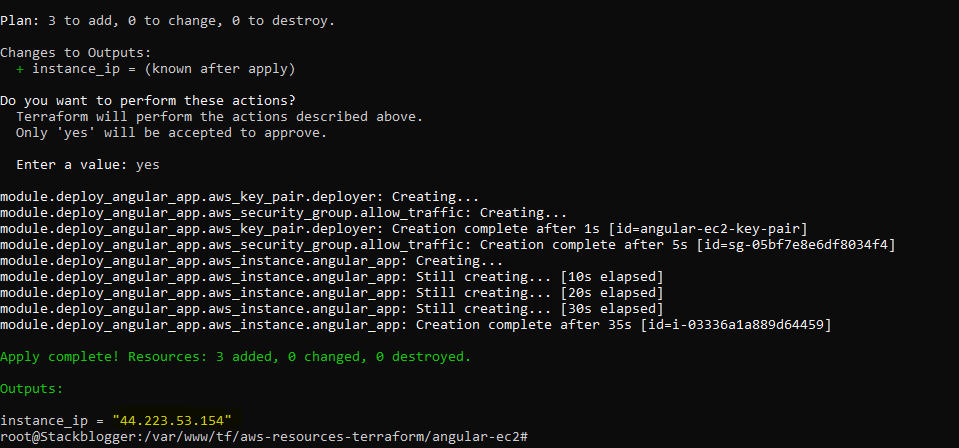
When prompted to confirm the apply, type yes.
Note: The output will be displayed after a few minutes (around 3-5 minutes) because the Angular build process may take some time to complete. Please be patient as Terraform provisions the resources and installs the necessary software.
Access Your Angular Application
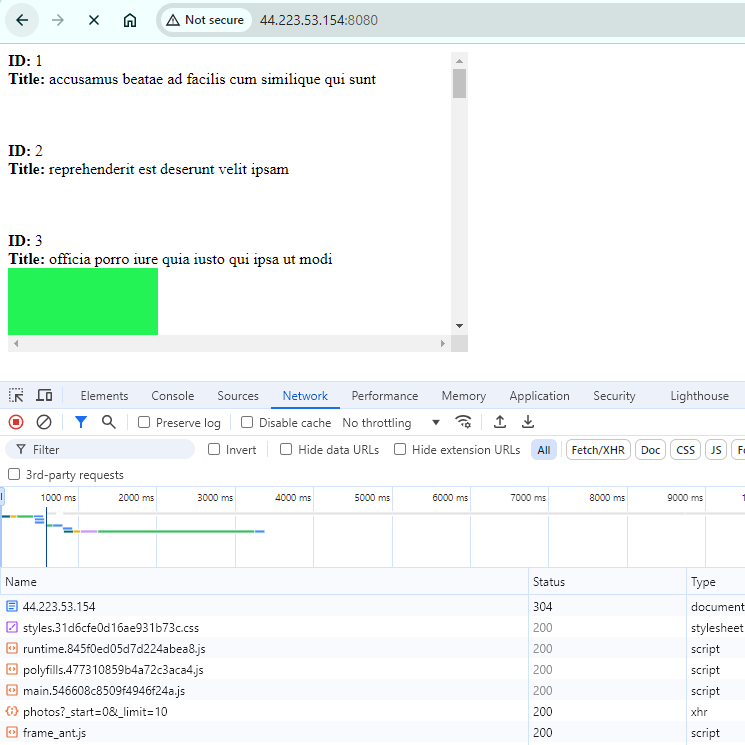
Once the EC2 instance finishes booting, Terraform will display the public IP address of your instance. You can access your Angular application by navigating to:
1 2 3 | http://<your_instance_ip>:8080 |
Replace <your_instance_ip> with the actual public IP address displayed in the output.
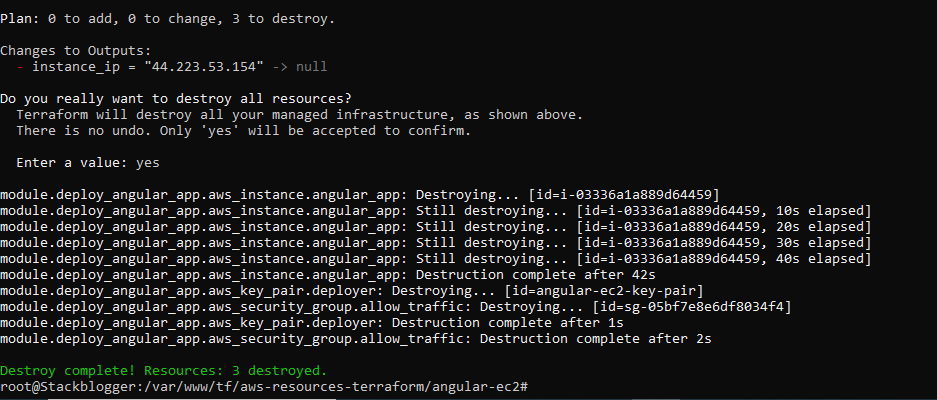
Destroy Resources
If you don’t want EC2 instance to continue run, destroy the resource with the following command.
1 2 3 | terraform destroy |
Confirm the action with yes and ENTER.
Conclusion
In this tutorial, we demonstrated how to deploy an Angular application on an AWS EC2 instance using Terraform. By cloning an existing GitHub repository that contains all the necessary configuration files, you can quickly set up your infrastructure without starting from scratch.
With the ability to automate deployments through Terraform, you can efficiently manage and replicate your cloud infrastructure while ensuring that your applications run smoothly.
Feel free to adjust the user data and configurations to better fit your application and deployment needs!


